How To Reorganize Your Facebook Bookmarks
For many Facebook users, the latest update back in February has them scratching their heads at how to rearrange and reorganize their favorite bookmarks. Gone are the little icons at the bottom of your screen – they now appear in your left side navigation menu, and almost everyone has realized those links do not move up and down, as we were once able to drag them before.
Here is how to drag your bookmarks back to the order you wish them to be:
 1. Select Application Settings from your Account drop down menu.
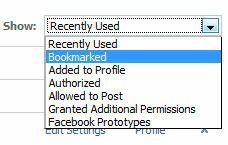
2. Choose Bookmarked from your Show drop down menu as shown to the right.
3. Drag any of your bookmarks to the position you wish them to appear, keeping in mind the top 3 will show above the ‘more’ link in your left navigation menu.
That’s it – you are done Enjoy your new bookmark order!
Note: I had this tutorial planned out last week, but completely forgot to actually post it. Thanks definitely go out to Insider reader Howie for reminding me
|
|
5 Comments |

|


Thank you so much for sharing this one.
A handy tutorial. Even after facebook changes, some things are still not obvious, so helpful tutorials like this clear up the ongoing confusion.
Simplified interface my ***.
now if you find out how to re-order the group lists under friends on the live feed,then I will be a very happy camper.
Love you guys!!